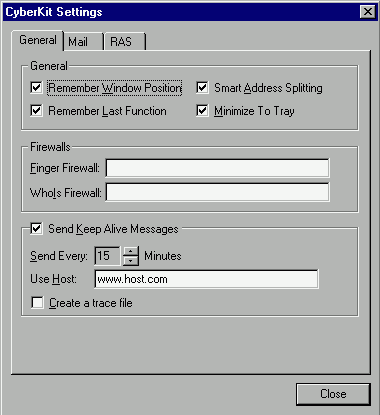

Remember Window Position
Check this if you want CyberKit to remember its window position. This way CyberKit will start where you last left it.
ウインドウの位置を記憶させる
CyberKitにそのウインドウの位置を記憶させたいときは、これをチェックします。こうしておけば、CyberKitは最後にあった場所で起動します。
Remember Last Function
Check this if you want CyberKit to remember the last used function. This way CyberKit will start with the last used function.
最後の機能を記憶させる
CyberKitに最後に使った機能を記憶させたい時は、これをチェックします。こうしておけば、最後に使った機能で起動します。
Smart Address Splitting
Check this if you want CyberKit to automatically split addresses at the @ sign when entered in the finger or whois client. This is very useful when you paste email addresses in the host or query field. CyberKit will also filter the host name out of an url (http://... or ftp (ftp://... address if you enable this option.
自動アドレス分割
これをチェックしておけば、fingerや whoisのクライアントでアドレスを入力したとき、@マークでアドレスは自動的に分割されます。ホストの Eメールアドレスや検索フィールドを貼り付ける時には、とても便利です。また、CyberKitは、このオプションを有効にしてあれば、url (http://...や ftp (ftp://...アドレスからホストネームも取り出すでしょう。
Minimize To Tray (not available on Windows NT 3.51 and lower)
Check this if you want CyberKit to minimize to the tray. CyberKit will add an icon to the tray and when you minimize CyberKit, it will remove itself from the task bar. The icon will show a little lightning flash whenever CyberKit is doing something. The color of this lightning flash indicates what is happening:
Yellow: A client function is active (ping, traceroute, etc.)
Green: CyberKit is checking for new mail.
Blue: CyberKit is keeping your connection alive.
Red: CyberKit is dialing your connection.
最小化してトレイにおく(Windows NT 3.51以前のバージョンでは無効)
これをチェックしておくと、CyberKitは最小化したときに、トレイにおかれます。トレイにはアイコンができます。最小化してあるときには、タスクバーから、削除することができます。このアイコンは、CyberKitが何か作動しているときには、小さな稲妻が表示されます。この稲妻の色で、何が作動しているかが分かります。
黄色:クライアント機能(ping, tracerouteなど)が作動しています。
緑色:新着メールをチェックしています。
青色:Keep Alive機能が働いています。
赤色:接続先にダイアルしています。
(lightning flash=稲妻の閃き)
If you left click on the tray icon, CyberKit will restore itself to its last position.
トレイのアイコンを左クリックすれば、CyberKitは、もとの場所に現れます。

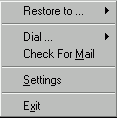
If you right click on the tray icon, you will get a popup menu from which you can choose a function like: restore to ping, Check for Mail, etc. Also you can dial your dialup connections from here.
トレイのアイコンを右クリックすれば、ポップアップメニューが現れ、pingや Check for Mailのような機能を選んで復元できます。また、ここからダイアルアップ接続をすることもできます。
Finger Firewall
If you have to use a firewall for finger, enter it here.
Finger Firewall
Fingerのためにファイアーウォールを使わなければならないときには、ここに入力してください。
Whois Firewall
If you have to use a firewall for whois, enter it here.
Whois Firewall
Whoisのためにファイアーウォールを使わなければならないときには、ここに入力してください。
Send KeepAlive Messages
Check this if you want CyberKit to keep your connection alive. The second light above the 'Go' button indicates the status of this function.
KeepAliveメッセージを送る
ここをチェックしておけば、接続を継続させることができます。「Go」ボタンの上の二番目の灯りがついていればこの機能が働いています。
Send every x minutes
Specify the interval between keep alive messages.
x分ごとに送る
KeepAliveメッセージを送る間隔を設定します。
(Specify=条件を指定する。)
Use host
Specify the host to connect to. CyberKit will ping this host periodically. If you leave this field blank, keep alive will not work.
ホストを使う
接続するホストを設定します。CyberKitは、このホストに定期的に pingをかけます。ここを空白のままにしておくと、keep alive機能は働きません。
Create a trace file
If you check this CyberKit will create a small log file in the CyberKit directory. The name of the log file is KeepAlve.log. You can use any editor to view this log file. This can be very useful to track down problems with this function.
trace fileを作成する。
ここをチェックすると、CyberKitは、CyberKitディレクトリに小さなログファイルを作成します。ログファイルの名前は、KeepAlve.logです。どんなエディタを使っても、このログファイルを見ることができます。これは、この機能で問題が生じたときその原因を突き止めるのにとても役に立ちます。
CyberKit, copyright 1996-1998 by Luc Neijens